Super
Edit Version 7 "retirement" announced
It is with a nostalgic tear that Editware announces that as of
January 1, 2002, we will no longer add new features and new protocols
to Super Edit Version 7. Read more about the status change of
Version 7 (from 'active' to 'retired') HERE. (12/17/01)
Power
Supply Failures
Customer Service has seen an increasing number of power
supply failures in VPE-131, 141L, and 241L
systems. The failure has sometimes caused damage to the backplane
and/or to the SBC. This same type of power supply is used in
most VPE-331, 341 and 351 systems. The risk of serious
damage is high enough that we recommend that all power supplies
of this type be replaced.
On-Board Diagnostics
To run the built-in eprom boot diagnostics to trouble
shoot your VPE, set the boot thumbwheel (rotary switch) to 6.
Return the thumbwheel switch to its original setting before returning
to edit.
|
BOOT Preference |
thumbwheel |
|
Floppy |
0 |
|
RAM |
2* |
|
Hard Disk |
4 |
|
EPROM (diagnostics) |
6 |
Procedure for running Super Edit from the
RAM disk
This procedure will allow you to run Super Edit from the Ram
disk of your VPE in the event that you have a non-functioning
hard drive on your system
VPE-151 or 251
1. Insert the UTILITIES DISK into DF0: and boot from the floppy
disk.
There are three methods of booting from floppy (chose one of
the following):
a. Select “BOOT FROM FLOPPY DF0:” from the prom-based
self test (second page)
b. Set the thumb wheel switch to 0 (middle thumb wheel on the
151) and press the “BOOT” switch
c. At the RT> prompt type the following: BOOT DF0: [ENTER]
2. When prompted if you wish to perform an UPDATE, press [CTRL][C]
twice on a K2 keyboard or [MAIN MENU] twice on the K5 keyboard.
3. At the RT> prompt type the following:
INIT/NOQ VM: [ENTER]
COPY/SYS DF: VM: [ENTER] (This takes a while, copying system
files)
COPY/BOOT RT11SJ.SYS VM: [ENTER]
COPY VM:STARTS.H VM:STARTS.COM [ENTER]
BOOT VM: [ENTER]
The system will boot to the Ram disk (VM:) and you should see
the MAIN MENU
4. Insert the PROGRAM DISK into DF0:
5. While at the MAIN MENU, press the left arrow three times to
get to the RT prompt.
At the RT> prompt type the following: COPY DF: VM: [ENTER]
6. VPE-251: Set the thumb wheel to 2 and re-boot.
VPE-151: At the RT> prompt type the following: BOOT VM: [ENTER]
for a soft re-boot
(Note: The VPE-151 has volatile RAM; a power cycle would clear
the RAM, losing Super Edit)
7. Run your listed Super Edit Program (Snnnnn).
VPE-331, 341 or 351
1. Boot from the UTILITIES DISK (at the RT> prompt type: boot
df0: [return] )
2. For Version 8.0 and later, you will be asked the question
– “Do you have the HD-4P upgrade kit?” (Did you
install new eproms for using 1.4MB floppy diskettes?) Answer
Y/N accordingly. The system will then take some time reading
the installation files from the floppy drive.
3. When prompted if you wish to do an UPDATE press [NO]
4. When prompted if you wish to do an INSTAL press [NO]
5. When prompted if you wish to install a new system on RAMDISK
press [YES]
6. You will be asked to confirm; “Are you sure? Y/N”
press [YES]
7. The system will inform that it will take 6 minutes to install
a RAMDISK. The actual time is closer to 12 minutes as Version
8.0 has a few more files to copy to ram than Version 7 (when
we wrote the RAMDISK Install application).
8. The system will inform that it is initializing VM (ram), copying
files from disk to VM, and then “cleaning up, almost done.”
9. The system then prompts you to put in the PROGRAM DISK. It
will copy all Super Edit files on the Program Disk to the newly
created RAMDISK.
10. Put the Boot Selection thumbwheel to 2 (for RAMDISK booting).
The thumbwheel is just to the right of DF0 and can be selected
without removing the motherboard from the frame (just remove
the front cover).
11. ReBOOT the system. The Main Menu should appear with the loaded
Super Edit program(s) listed in the far right column.
Total time is 11 ½ minutes.
If you wish to return to Hard Drive booting, set the BOOT
thumbwheel back to 4 (0 is for booting from floppy, 2 for RAMDISK,
4 for Hard Drive and 6 for EPROM diagnostics).
VPE-241 Floppy Drive Installation
If you are currently using or plan to install Super Edit Version
8.0 or higher software, your VPE-241 will have the ability to
utilize a high density 1.44MB floppy disk drive.
Changing your current VPE-241 floppy drive to a high density
floppy drive
1. Remove power cord from chassis.
2. Remove 10 screws holding top lid of chassis.
3. Place chassis on it’s side. Locate and remove 3 of 4
screws holding disk drive.
4. While holding disk drive firmly, remove the last screw insuring
not to drop the drive.
Note the cable installation and remove the drive.
5. Re-install the cables onto the new drive, then install the
new drive into the chassis. Re-install
the top cover.
Setting the FLOPPY DRIVE DESIGNATION
When adding or replacing a HDFD (High
Density) floppy disk drive in your IPS or VPE system, it may
be necessary to change the default drive number setting of the
new floppy drive(s).
If your system has 1 (one) floppy drive it is by default DF0:.
If your system has 2 (two) floppy drives, the drive on the left
is DF1:.
Changing the DF: setting in your HDFD floppy drive:
Using a small screwdriver, gently pry up the lock tabs (two on
each side) as shown in Figure 1.
With all four tabs loosened, you should have access to the designator
jumper shown in Figure 2.
For the drive to be configured as DF0: jumper posts 2 and 3.
For the drive to be configured as DF1: jumper posts 1 and 2.
HD-4P and INSTALLING VERSION 8 on the VPE-300
Series
When updating or installing Version 8 Super Edit software on
your VPE the following comment appears:
“If you have installed the HD-4P upgrade kit on your
SBC board, or if you have purchased your system with the HD-4P
upgrade kit already installed, answer YES to the next question.”
The next question is regarding your system's version of HI and
LO ram chips installed on your SBC that relate to the disk handler
and the number of partitions on the hard disk drive.
This ram upgrade kit (two chips) has been installed on all VPEs
sold by Editware since May, 1997 and supplied with all Super
Edit Version 8 software upgrades. But not everyone has installed
them or you may have a system that you are not sure about.
To determine if your SBC has the HD-4P upgrade kit installed:
Power off the VPE
Remove the SBC board
Check the HI/LO ram chip version
(Look along the right edge near the middle
of the board, they have paper labels on them with serial numbers,
etc)
Replace the SBC board
Power on the VPE
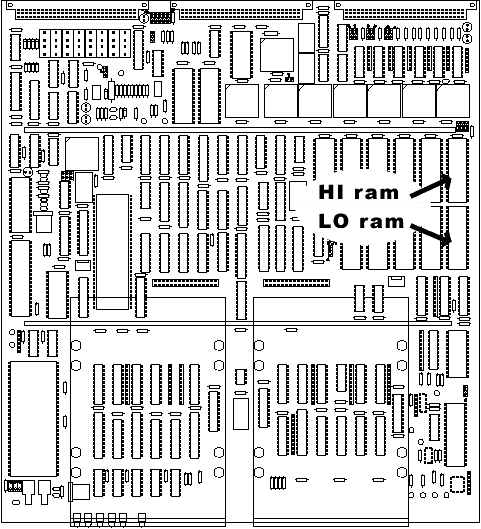
If the top line of the label ends with “DIAG V4.3” your SBC has the upgrade kit installed. Answer YES to the HD-4P question.
If the label ends with "DIAG V4.2" then you DO NOT have the upgrade kit installed. Answer NO to the HD-4P question.
Unfortunately, answering incorrectly to the HD-4P question, will cause an error that prevents further hard disk drive access. The hard disk drive handler no longer matches the partitioning of the hard drive. Fortunately this error is recoverable but requires that you MUST INSTALL Version 8 again, which re-initailizes the hard disk wiping out all previous information.
To recover from incorrect answering of the HD-4P question (if you answered NO but do have the chips or answered YES but do not have the chips installed), you need to boot from the Installation Disk (Utilities floppy disk), exit to the RT prompt [Control]+[C], type [copy starts.tmp starts.com][ENTER] and re-boot. The initial HD-4P question will be presented again for your correct input.
From this point, regardless of your answer to the HD-4P question, YOU MUST NOW CHOOSE INSTALL (Update will NOT work) and proceed with the installation.
|
Once again: |
|
If your HI/LO chips are V4.3, say YES; if they are V4.2,
say NO |
|

